Saturday, March 6, 2010

a cake decorating party!

For my daughter's 6th birthday, it only seemed appropriate to throw a cake decorating party. We started with a manageable amount of girls.... very important!. Five, five to seven year olds, plus my eight year old son who volunteered  to be a "helper" but gladly stepped in the place of one girl that couldn't make it to decorate his own cake.

First, we decorated little aprons. Unfortunately, the paint takes 24 hours to dry so they couldn't wear them while decorating the cakes. ....... Here's Lili with her apron, since I forgot to take a picture of the decorating in action.


Next on to the present opening.... this took Lili about 2 seconds.


To curb the finger licking during the cake decorating, we served the birthday cupcakes. Unfortunately, I couldn't find the one match I reserved for this occasion.


The decorating begins. Six little cakes and all kinds of sprinkles, frostings and fondant cutouts.

We had some very creative girls and awesome cake decorators.
Lili, the birthday girl

Addison

Kaylee

Carlie

Karington

and of course, the boy that isn't afraid to be with the girls, Joel.


After they finished decorating the cakes, we boxed them up, tied them with a ribbon and picked out a cookie cutter for them to take home for their birthday prizes.
Aren't these little boxes the cutest?

Outside for fun and games and to run off the sugar. The key to a successful party is short & sweet. We had both!

Happy Birthday, Lili!

Tuesday, February 16, 2010

Graduation Cake Ideas

With graduation quickly approaching, I thought I'd show some photos of previous cakes that I have done. The first are your more traditional sheet cakes. I like to add fondant flowers and diplomas. Two of them feature an edible image.

Photobucket


Photobucket


Photobucket

The following graduation cakes are not based on school colors, but the theme of the party or likes of the graduate. These really make the centerpiece of the graduation and are really a fun addition. You might also like to incorporate your child's activities or interests into the cake.

Photobucket


Photobucket


Photobucket
For ordering information, please visit my website. Hurry, spots are filling up fast!

Saturday, February 13, 2010

wedding trends: cake buffet

An array of delicious dessert cakes is a new trend among brides. This cake table features Carrot Cake with cream cheese frosting rolled in walnuts, Raspberry Laced White Cake, Triple Chocolate Cake with a whipped ganache filling and ganache poured over top, and Pink Champagne Cake with a strawberry cream cheese filling.

Photobucket

You can make place cards to put in front of each cake with the cake flavors.

Photobucket

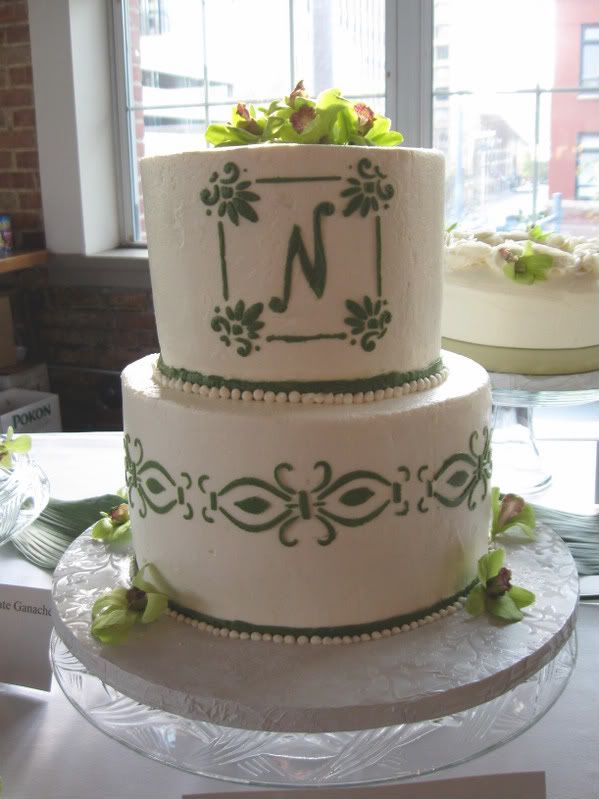
A small brides cake was placed in the center for the bride and groom to cut. This cake features stenciling.

Photobucket


For ordering information, please visit my website.

Friday, February 12, 2010

baby girl cupcakes

These cupcakes are all perfectly pink champagne for a baby girl shower.

cupcakes

Wednesday, February 10, 2010

Just in Time for Valentines

Give some of these little yummies to your sweetheart. Pink champagne cake with vanilla buttercream.

cupcakes

Saturday, November 7, 2009

Bridal Showers & Birthdays

The first two sheet cakes were for a Bridal Shower. The only request was for black, red and white. I wanted to find a little more modern look than the traditional flowers and came up with this. I love how it turned out.


The following cake was for a 4 year old boy that wanted a Sportacus cake. He's a character off the PBS show Lazy Town. Unfortunately I did not realize he was a real person until about 10pm last night. I finished about 2:30am. Real people are MUCH harder to do. I'm happy with the result. I guess the proof is in whether or not the little boy recognized him!

The last cake is a Chocolate Oblivian Truffle Torte decorated in white chocolate leaves plaque.

Saturday, October 10, 2009

Whew!

So glad this one is done. I booked this wedding over a year ago in Omaha. At the time it was only a 45 minute trip. Today it was a 3 1/2 hour trip one way, on the coldest and ickiest day so far this year. I'd been dreading the trip for some time. But I made it with no mishaps. Done and delivered. Yay. Yay! Yayyy!!!  I was even pretty happy with the outcome. There were a few things, of course, that I would have liked to improve upon. But everything overall was great. I even managed to successfully carry the entire 4-tiered brides cake up to the second floor. You would think that a hotel as nice as the Paxton would have a cart.


This was the grooms cake. So fun! It took about 8 hours.


Brides cake. It had a lot going on as per brides request. As long as she's happy... I'm happy! One thing I did differently this time was to line both of the cake boards with fondant. It took a little more time but gave it a much nicer, more finished look.

After no sleep and the long drive, well, I guess I'm so happy to be done that I don't feel completely worn out!

Friday, October 2, 2009

Fall, tea & scones

There's nothing better with cool, breezy Fall weather than a  cup of chai and a scone. Well actually it's a bit more than breezy and I'd rather have a latte but you just can't make them good at home.  So just imagine, if you will, the nice, calm, relaxing morning this thought evokes. Forget about the reality for just 15 minutes.

Here you go....


Now you can either come over and have some with me, or buy some chai and make the scones with the recipe below. These are absolutely wonderful.

Cranberry Orange Scones

Copyright, 2006, Ina Garten, All Rights Reserved

Ingredients

4 cups plus 1/4 cup all-purpose flour
1/4 cup sugar, plus additional for sprinkling
2 tablespoons baking powder
2 teaspoons kosher salt
1 tablespoon grated orange zest
3/4 pound cold unsalted butter, diced
4 extra-large eggs, lightly beaten
1 cup cold heavy cream
1 cup dried cranberries
1 egg beaten with 2 tablespoons water or milk, for egg wash
1/2 cup confectioners' sugar, plus 2 tablespoons
4 teaspoons freshly squeezed orange juice

Directions
Preheat the oven to 400 degrees F.

In the bowl of an electric mixer fitted with a paddle attachment, mix 4 cups of flour, 1/4 cup sugar, the baking powder, salt and orange zest. Add the cold butter and mix at the lowest speed until the butter is the size of peas. Combine the eggs and heavy cream and, with the mixer on low speed, slowly pour into the flour and butter mixture. Mix until just blended. The dough will look lumpy! Combine the dried cranberries and 1/4 cup of flour, add to the dough, and mix on low speed until blended.
Dump the dough onto a well-floured surface and knead it into a ball. Flour your hands and a rolling pin and roll the dough 3/4-inch thick. You should see small bits of butter in the dough. Keep moving the dough on the floured board so it doesn't stick. Flour a 3-inch round plain or fluted cutter and cut circles of dough. Place the scones on a baking pan lined with parchment paper. Collect the scraps neatly, roll them out, and cut more circles.

Brush the tops of the scones with egg wash, sprinkle with sugar, and bake for 20 to 25 minutes, until the tops are browned and the insides are fully baked. The scones will be firm to the touch. Allow the scones to cool for 15 minutes and then whisk together the confectioners' sugar and orange juice, and drizzle over the scones.

Friday, September 18, 2009

A very very birthday


Today is my daughter's 14th birtday, and I managed to escape before it was completely over. I'm hot and tired! Still the mess to clean up, but we'll enjoy the photos first.


We had the party on our front porch. No railing on the porch yet but still fun to be able to have an entire party on a porch.


My decorating is a little understated for the large porch but I'm too cheap to spend all that money just for decorations. We had smoothies and snacks.


The birthday girl and her cake.
We better have a close up of that cake....


It was quite lovely and tasted good too!


Alex waiting to get her face painted. I painted a lot of faces.


This one is my favorite.


Girls got their own ideas and thought the water balloons were not enough. Notice the bucket.


A bunch of crazy girls.

They played Red Rover and now doing flipping contests on the trampoline. Still 20 minutes till its officially over. I guess I will go clean up. Hope you had a happy birthday, Grace!

Thursday, September 17, 2009

Heavenly Bites

Today I had to make a small dessert buffet for a customer. This means a sugar high because they are just these little delicious bites and you have to make sure everything tastes just right! First there are these yummy, moist, chocolatey brownie bites topped with ganache. Rich, rich, rich!
Then we have lemon tartlets. The bottom is lemon mousse made with lemon curd with a little dollop of curd on top. 
And finally New York style cheesecake with fresh strawberries and Turtle Cheesecake.

Monday, August 31, 2009

Wine Bottle Cake

I have a love/hate relationship with cake art. I get so excited to get started a on new cake and have a beautiful vision in my head of how its going to turn out. But that vision evolves as I go along, dealing with the unpredictability of cake. About half way through the project I'm usually still quite optimistic. It's usually 2/3 to 3/4 of the way through that I start to get stressed and depressed. It's not looking like the vision in my head. Flaws are appearing; everything is not as smooth as I like. But when I complete the work, I've worked through those flaws, modified my plans, and given my self some grace with the imperfections.

Such is the case with this weekends cake. I worked through running out of fondant and having to match a new batch to the same green color, which I didn't at first. Paint and luster dust saved me here. The second batch of fondant was way too soft and hard to work with, making it tear and bumpy. I was able to mask some of those problems. I wish the necks of the wine bottles were thinner, but it is cake and you need some there to eat! I was going to print out labels for the bottles on my edible image printer but couldn't find the cord since we moved. But in painting it, with the board covering and the luster dust on the bottles, the final overall effect was like an old painting and I really liked it.

Every cake I make seems to go through this process and my husband would really like to strangle me in the middle of it. But my main goal is to make the client happy. Which I received this email from the lady who ordered the cake wine bottles pictured below:

Cheryl, Your cakes were the big hit of the party! I should have taken more of your business cards, because a lot of people wanted one! We had just enough to finish today, and it was just as good as yesterday! Everyone remarked about how delicious the cakes were and how even the fondant was tasty! Attached is a picture of the birthday boy with the cakes; he was really impressed! Thanks! Gloria

This is what I work for.

Tuesday, August 25, 2009

For serious chocolate lovers only...

I have been making this recipe for years and it is a favorite of chocolate lovers the world round. It is so simple to make, yet puts off an elegant and sophisticated presentation. I like to keep its simple three ingredients a secret for this reason. I use it when I want to seriously impress. But here I am sharing it with the world so you too can experience this heavenly dessert. If your not the baker type, just visit me at http://www.dragonflydesserts.com/ and I will make one for you!

Chocolate Oblivion Truffle Torte

By Rose Levy Beranbaum, author of The Cake Bible says this is her favorite way to eat chocolate. Beranbaum goes into great detail in the recipes in her book to enable you to get the best results possible. I have not included all the hints and tips here.

Ingredients (all at room temperature):

bittersweet chocolate: 1 pound (I use Ghirardeli bittersweet chocolate chips)
unsalted butter: 1 cup
6 large eggs

If bittersweet is just too bitter, try half bittersweet and half semisweet chocolate.

Prepare pan: One 8-inch springform pan at least 2 1/2 inches high, buttered and bottom lined with buttered parchment or wax paper; outside of pan wrapped with a double layer of heavy-duly foil to prevent seepage. One 10-inch cake pan or roasting pan to serve as a water bath. (I think spring form pans are overrated and use an 8"x 2" cake pan. I also make these in sheet pans for dessert buffets. No heavy duty foil needed for seepage.)

Preheat the oven to 425 degrees F.

In large metal bowl set over a pan of hot, not simmering, water (the bottom of the bowl should not touch the water) combine the chocolate and butter and let stand, stirring occasionally, until smooth and melted. (The mixture can be melted in the microwave on high power, stirring every 15 seconds. Remove when there are still a few lumps of chocolate and stir until fully melted....this is what I do)

In a large bowl set over a pan of simmering water heat the eggs, stirring constantly to prevent curdling, until just warm to the touch. Remove from the heat and beat, using the whisk beater, until triple in volume and soft peaks form when the beater is raised, about 5 minutes. (To insure maximum volume if using a hand mixer, beat the eggs over simmering water until they are hot to the touch, about 5 minutes. Remove from the heat and beat until cool.)


Using a large wire whisk or rubber spatula, fold 1/2 the eggs into the chocolate mixture until almost incorporated. Fold in the remaining eggs until just blended and no streaks remain. Finish by using a rubber spatula to ensure that the heavier mixture at the bottom is incorporated.


Scrape into the prepared pan and smooth with the spatula. Set the pan in the larger pan and surround it with 1 inch very hot water. Bake 5 minutes. Cover loosely with a piece of buttered foil and bake 10 minutes. (The cake will look soft, but this is as it should be.) Here is one I baked in a large square cake pan.


Let the cake cool on a rack 45 minutes. Cover with plastic wrap and refrigerate until very firm, about 3 hours.

To unmold: Have ready a serving plate and a flat plate at least 8 inches in diameter, covered with plastic wrap. Wipe the sides of the pan with a hot, damp towel.
Run a thin metal spatula around the sides of the cake and release the sides of the springform pan. Place the plastic-wrapped plate on top and invert. Wipe the bottom of the pan with a hot, damp towel. (I run the bottom of the pan over a hot burner) Remove the bottom of the pan and the parchment. Reinvert onto the serving plate.

I always make a quick ganache (equal parts chocolate and heavy cream heated and blended) and spread over the top for a nice smooth finish. You can top with dollops of whipped cream flavored with espresso, or a raspberry or orange syrup. Here are some I cut into small squares to serve at a dessert buffet.


Store: 2 weeks refrigerated. Do not freeze because freezing changes the texture.
Serve: Room temperature. Cut into narrow wedges with a thin sharp knife that has been dipped in hot water.
Pointers for success: For a moist airy texture, be sure to add beaten eggs to chocolate mixture and not the chocolate to the eggs. Wrapping the pan with foil keeps it watertight. Chill thoroughly before unmolding. Use the plastic-wrapped plate when unmolding to protect the surface of cake if you're not planning to use a topping.

Understanding: Just as for cheesecake, baking the Oblivion in a water bath keeps the texture creamy throughout. When this cake is served at room temperature, you get a rush of chocolate from the moment it enters your mouth. The full flavor of chocolate can best be appreciated only in a softened state. (A chocolate bar, for example, has to start melting in the mouth before the flavor comes through.) The butter and eggs do not distract. Instead they contribute structure and the desired creamy texture.
Serves 16.

The Cake Bible by Rose Levy Beranbaum (Morrow Cookbooks, September, 1988) - reprinted with permission